Tutorial - Introduction to CIA
| Introduction to CIA |
|
|
| Start |
|
The one big question, that you'll have in mind when you're starting the program for the very first time is: What am I gonna do with it ??? Let's start with a simple example: <back> |
| A Simple Quest |
|
Given is the following switch function: f(x,y,z) = x' y + z The task is to create the cirquit layout for the function f, and to check the result by the aid of a simulation. For that we need a new document-sheet. <back> |
| Creating a Document |
|
When opening CIA, it creates automatically an empty new document ( New Document 1 ). 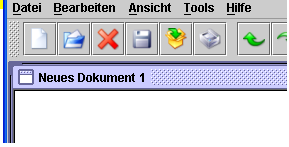
If you're in need of another new document while beeing at work with CIA, you can always open one with the point "File\New"(Datei\Neu). 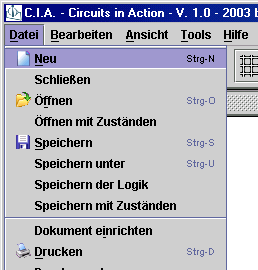
The shortcut  or the key-combination Strg-N
leads to the same result. or the key-combination Strg-N
leads to the same result. By default, a document doesn't own a grid where you can orient the modules. But by the menu-point "View\Grid on_off" (Ansicht\Raster_an/aus) 
or by the shortcut  it can be faded in or out. it can be faded in or out.
Now, how does our document become alive? <back> |
| Placement of an Object |
|
Like you see at the following switch-function, you need three inputs ( x, y and z ), a negotiator ( NOT-Gate ), an AND-gate, an OR-gate and a display for the result. To place a simple module on your working-space, just open the index-point "standard-gate"("Standard Gatter"). 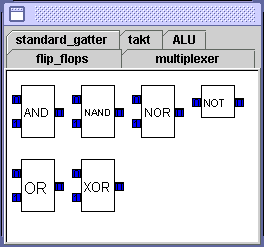
Click on "NOT" and hold the left mouse-button. Pull the module onto your document and let it go. By now the first module is placed. 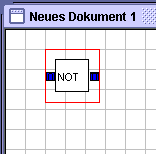
Deal the other modules by the same way. The Inputs are realized by the switches in the index-point XY, the output by XYZ. <back> |
| Moving an Object |
|
When you placed all your modules on the working-space you'll maybe recognize that there may be possibly an improvement To move a module, just select it by a left-click and drag it with pressed mouse-button to the place where you want it. <back> |
| Properties of an Object |
|
|
| Linking Objects |
|
After putting the modules to their right places, there comes the next step: linking the modules with wire ! Just click the left mouse-button on the output of a module and hold it. Move the mouse - now you see the striped red line follow your movements. 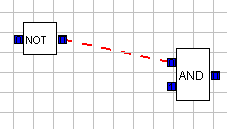
Release the button while the mouse-pointer is above an input of another module. Now the two modules are linked. 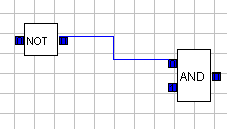
<back> |
| Simulation of the Cirquit |
|
So, the cirquit is built....but is it correct ??? Now you can use the function "simulation" by this shortcut  By checking several different switch-positions and the individual result, you can test your cirquit for correctness. Save the circuit with the menu-point "File\Save" (Datei\Speichern_unter) (or with the shortcut Strg-U or  ) into a folder
of your choice and be proud that you absolved the first introcuction to
the CIA with success. ) into a folder
of your choice and be proud that you absolved the first introcuction to
the CIA with success.<back> |
| Automatic Routing |
|
If you got a more complex cirquit where the modules are scrambled all over the working-space, you don't have to orient them by hand. This work does the menu-point Tools\Routing for you (or use the shortcut Str-O ). 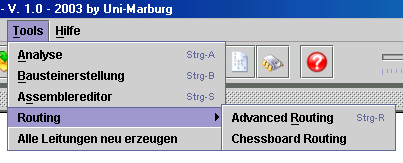
That's how it could look before routing: 
Mark the modules whose wires should be optimized, and select the automatic routing. The program selects automatically the best routing and changes the way of the wire. 
<back> |
