Graphics Programming
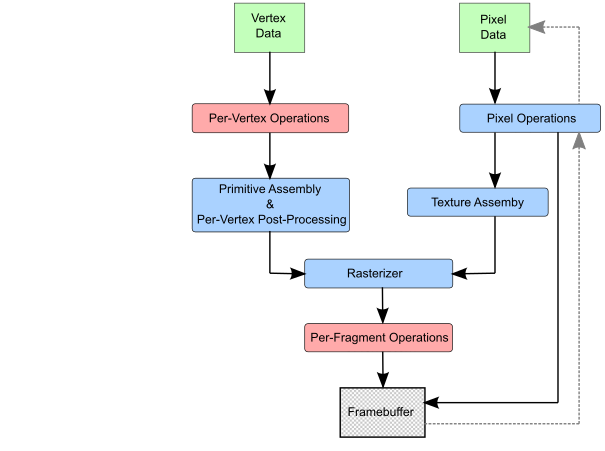
OpenGL Pipeline
Thorsten Thormählen
October 25, 2025
Part 4, Chapter 1
Thorsten Thormählen
October 25, 2025
Part 4, Chapter 1
This is the print version of the slides.
Advance slides with the → key or
by clicking on the right border of the slide
Slides can also be advanced by clicking on the left or right border of the slide.
#include <GL/gl.h>
#include <GL/glu.h>
#include <GL/glext.h>
#include <GL3/gl3.h>
#include <GL3/gl3ext.h>
#include <GL/freeglut.h>(Gl/gl.h and GL/glu.h are automatically included)
#include <GL/freeglut.h> // we use glut as window manager

class Renderer {
public:
  void init() {...}
  void resize(int w, int h) {...}
  void display() {...}
  void dispose() {...}
};

// static objects and callbacks
static Renderer *renderer;

static void glutResize(int w, int h)
{
  renderer->resize(w, h);
}

static void glutDisplay()
{
  renderer->display();
  glutSwapBuffers();
}

static void glutClose()
{
  renderer->dispose();
}

int main(int argc, char **argv) {
  glutInit(&argc, argv);
  glutInitDisplayMode(GLUT_DEPTH | GLUT_DOUBLE | GLUT_RGBA);
  glutInitWindowPosition(100,100);
  glutInitWindowSize(320, 320);
  glutCreateWindow("WindowTitle");
  glutDisplayFunc(glutDisplay);
  glutReshapeFunc(glutResize);
  glutCloseFunc(glutClose);
  renderer = new Renderer;
  renderer->init();
  glutMainLoop();
}
QOpenGLWidget must be overwrittenQT += widgets opengl openglwidgets"QT += widgets opengl openglwidgets TARGET = ApplicationName SOURCES += main.cpp Widget1.cpp Widget2.cpp HEADERS += Widget1.h Widget2.h
#include <QApplication>
#include <QOpenGLWidget>
#include <QOpenGLFunctions_2_0>
class Renderer : protected QOpenGLFunctions_2_0 {
public:
void init() {
initializeOpenGLFunctions();
...
}
void resize(int w, int h) {...}
void display() {...}
void dispose() {...}
};
class MyWidget : public QOpenGLWidget {
private:
Renderer *renderer;
public:
MyWidget(QWidget *parent = NULL) : QOpenGLWidget(parent) {
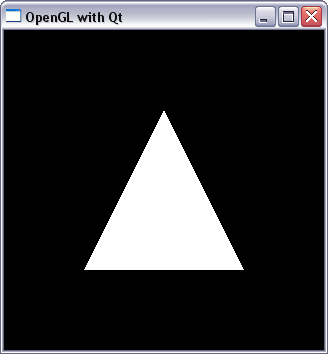
this->setWindowTitle("OpenGL with Qt");
this->resize(320, 320);
renderer = new Renderer();
}
~MyWidget() {
makeCurrent();
renderer->dispose();
doneCurrent();
delete renderer;
}
protected:
void initializeGL() { renderer->init(); }
void resizeGL(int w, int h){ renderer->resize(w, h); }
void paintGL() { renderer->display(); }
};
int main (int argc, char* argv[]) {
QApplication appl(argc, argv);
MyWidget widget; // create a widget
widget.show(); //show the widget and its children
return appl.exec(); // execute the application
}
Compilation: (in a shell)
javac -classpath "jogamp-fat.jar" sourcefile.java
Execution:
java -classpath "jogamp-fat.jar;." sourcefile
The following additional command line parameters are required for the current JDK version (Java 25):
java --add-exports java.desktop/sun.awt=ALL-UNNAMED
     --enable-native-access=ALL-UNNAMED
     -classpath "jogamp-fat.jar;." sourcefile
Classpath for Linux:
-classpath "jogamp-fat.jar:."
import java.awt.*;
import java.awt.event.*;
import javax.swing.*;
import com.jogamp.opengl.*;
import com.jogamp.opengl.awt.GLCanvas;
import com.jogamp.opengl.util.FPSAnimator;
import static com.jogamp.opengl.GL.*;
import static com.jogamp.opengl.GL2.*;


class Renderer {
  public void init(GLAutoDrawable d) {...}
  public void resize(GLAutoDrawable d, int w, int h) {...}
  public void display(GLAutoDrawable d) {...}
  public void dispose(GLAutoDrawable d) {...}
}

class MyGui extends JFrame implements GLEventListener{
  private Renderer renderer;

  public void createGUI() {
    setTitle("JoglFirstTriangle");
    setDefaultCloseOperation(JFrame.EXIT_ON_CLOSE);

    GLProfile glp = GLProfile.getDefault();
    GLCapabilities caps = new GLCapabilities(glp);
    GLCanvas canvas = new GLCanvas(caps);
    setSize(320, 320);
    getContentPane().add(canvas);
    final FPSAnimator ani = new FPSAnimator(canvas, 60, true);
    canvas.addGLEventListener(this);
    setVisible(true);
    renderer = new Renderer();
    ani.start();
  }

  @Override
  public void init(GLAutoDrawable d) {
    renderer.init(d);
  }

  @Override
  public void reshape(GLAutoDrawable d, int x, int y,
                      int width, int height) {
    renderer.resize(d, width, height);
  }

  @Override
  public void display(GLAutoDrawable d) {
     renderer.display(d);
  }

  @Override
  public void dispose(GLAutoDrawable d) {
    renderer.dispose(d);
  }
}

public class JoglFirstTriangle {
  public static void main(String[] args) {
    System.setProperty("sun.java2d.uiScale", "1.0");
    javax.swing.SwingUtilities.invokeLater(new Runnable() {
      public void run() {
        MyGui myGUI = new MyGui();
        myGUI.createGUI();
      }
    });
  }
}
init(), resize(), display(), and dispose() of the class Renderer are presented,
which are completely independent of the employed window manager
class Renderer {
public:
  void init() {}
  void resize(int w, int h) { glViewport(0, 0, w, h); }
  void display() {
    glClearColor(0.0f, 0.0f, 0.0f, 0.0f);
    glClear(GL_COLOR_BUFFER_BIT);
    glLoadIdentity();
    glOrtho(-1.0f, 1.0f, -1.0f, 1.0f, -1.0f, 1.0f);
    glColor3f(1.0f, 1.0f, 1.0f);
    glBegin(GL_TRIANGLES);
    glVertex3f(-0.5f, -0.5f, 0.0f); // vertex on the left
    glVertex3f( 0.5f, -0.5f, 0.0f); // vertex on the right
    glVertex3f( 0.0f,  0.5f, 0.0f); // vertex at the top of the triangle
    glEnd();
  }
  void dispose() {}
};
glColor(...) sets the current drawing color
glColor(...)
glPushAttrib() onto a stack and later re-active them by popping them from the stack with glPopAttrib()
... // draw something here
glPushAttrib(GL_LINE_BIT);
  glEnable(GL_LINE_SMOOTH);
  glEnable(GL_LINE_STIPPLE);
glPushAttrib(GL_COLOR_BUFFER_BIT);
  glEnable(GL_BLEND);
  glDisable(GL_DITHER);
... // drawing something special here
glPopAttrib(); // restore GL_COLOR_BUFFER_BIT
glPopAttrib(); // restore GL_LINE_BIT
... // draw more here


glVertex(...) the vertices are passed individually
glBegin(GL_TRIANGLES);
glVertex3f(-0.5f, -0.5f, 0.0f); // vertex on the left
glVertex3f( 0.5f, -0.5f, 0.0f); // vertex on the right
glVertex3f( 0.0f,  0.5f, 0.0f); // vertex at the top of the triangle
glEnd();
glBegin(...)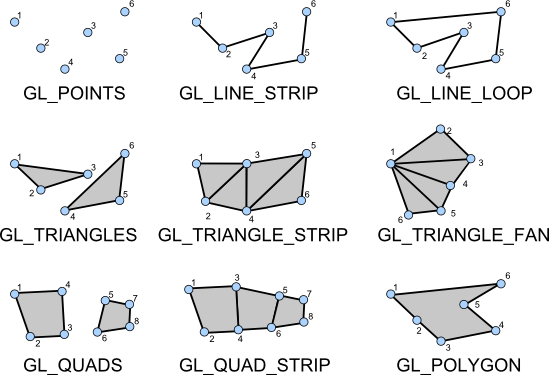

Please notify me by e-mail if you have questions, suggestions for improvement, or found typos: Contact