Graphics Programming
GUIs with Java
Thorsten Thormählen
October 21, 2019
Part 2, Chapter 2
Thorsten Thormählen
October 21, 2019
Part 2, Chapter 2
This is the print version of the slides.
Advance slides with the → key or
by clicking on the right border of the slide
Slides can also be advanced by clicking on the left or right border of the slide.
| API | Funktion |
|---|---|
| Abstract Window Toolkit (AWT) | Base classes for GUI components, events, and layouts |
| Swing | GUI components, changeable look-and-feel |
| Java 2D | Drawing of 2D elements |
| Java Accessibility | Accessibility support, e.g., for people with visual impairments |
| Data Transfer | Cut-and-paste, drag-and-drop |
javac sourcefile.java
java sourcefile
JFrame component as a top-level container
JLabel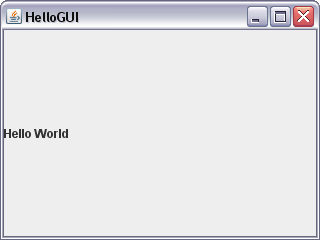
Source code of the example: HelloGUI.java
import javax.swing.*;

class MyGui extends JFrame { // class with own GUI components
  ...
}

public class HelloGUI {
  public static void main(String[] args) {
    javax.swing.SwingUtilities.invokeLater(new Runnable() {
      public void run() {
        MyGui myGUI = new MyGui(); // Create instance of own class
        myGUI.createGUI();         // in the event dispatching thread
      }
    });
  }
}
import javax.swing.*;

class MyGui extends JFrame {
  public void createGUI() {
    setTitle("HelloGUI");
    setDefaultCloseOperation(JFrame.EXIT_ON_CLOSE);
    setSize(320, 240);
    JLabel label = new JLabel("Hello World");
    getContentPane().add(label);
    setVisible(true);
  }
}

public class HelloGUI {
  ...
}
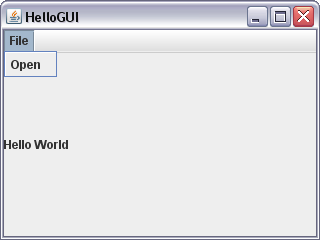
class MyGui extends JFrame {
  public void createGUI() {
    ...
    JMenuBar menuBar = new JMenuBar();
    JMenu menu = new JMenu("File");
    menuBar.add(menu);
    JMenuItem item = new JMenuItem("Open");
    menu.add(item);
    setJMenuBar(menuBar);

    setVisible(true);
  }
}
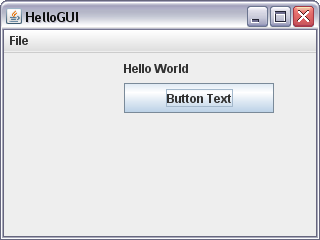
class MyGui extends JFrame {
  public void createGUI() {
    ...
    setLayout(null); // keine automatisches Layout

    JLabel label = new JLabel("Hello World");
    label.setBounds(120, 0, 150, 30); // manuelles Positionieren
    getContentPane().add(label);

    JButton button = new JButton("Button Text");
    button.setBounds(120, 30, 150, 30);
    getContentPane().add(button);
    ...
  }
}

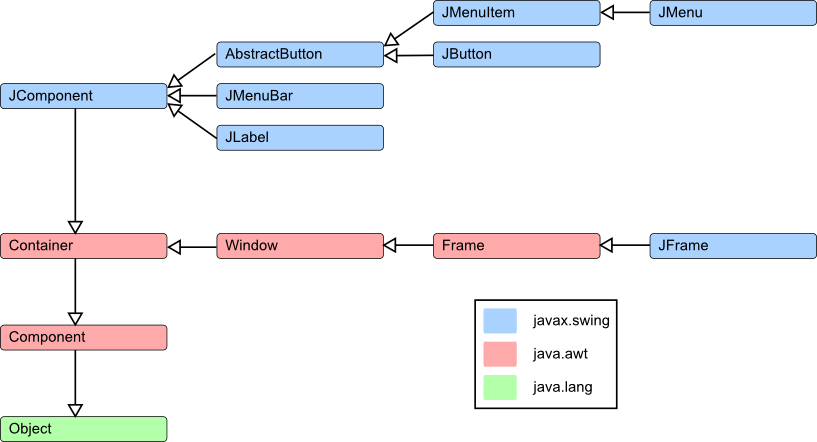
AbstractButton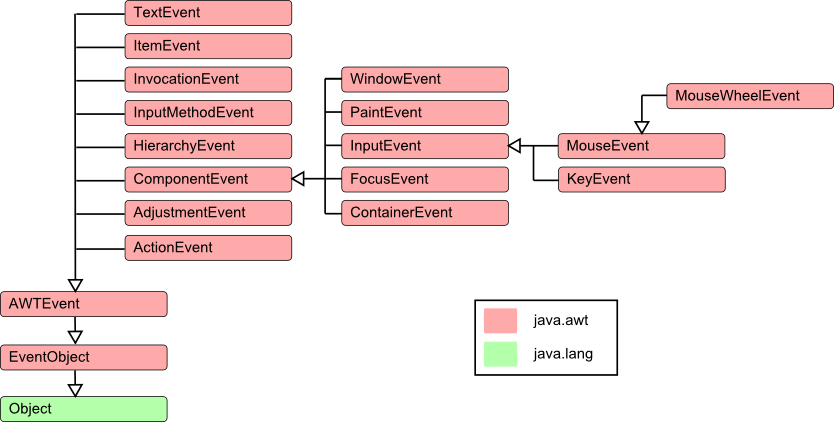
public class ActionEvent extends AWTEvent
{

  // constructors
  public ActionEvent(Object source, int id, String command) { ... }
  ...
  // public members
  public String getActionCommand() { ... }
  public long getWhen() { ... }
  public int getModifiers() { ... }
  public String paramString() { ... }
}
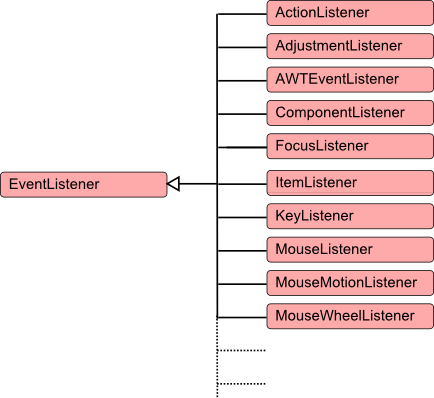
ActionListener
public interface ActionListener extends EventListener {
  void actionPerformed(ActionEvent event);
}
AbstractButton
public abstract class AbstractButton extends ... {
  ...
  public void addActionListener(ActionListener l) {... }
  public void removeActionListener(ActionListener l) {... }
  public ActionListener[] getActionListeners() {... }
  ...
}
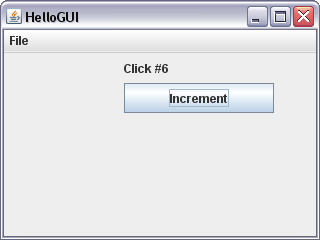
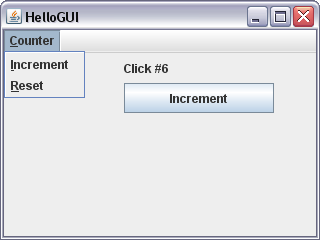
Source code of the example: ActionButton
class MyGui extends JFrame implements ActionListener{

  private int counter = 0;
  JLabel label = new JLabel("Hello World");

  public void createGUI() {
    ...
    JButton button = new JButton("Increment");
    button.addActionListener(this);
    getContentPane().add(button);
    ...
  }
  public void actionPerformed(ActionEvent event) {
    counter++;
    label.setText("Click #" + Integer.toString(counter));
  }
}
class MyGui extends JFrame implements ActionListener{
    ...
    JMenuItem item2 = new JMenuItem("Reset", KeyEvent.VK_R);
    item2.addActionListener(this);
    item2.setActionCommand("ResetCmd");
    menu.add(item2);
    setJMenuBar(menuBar);
    ...
  }

  public void actionPerformed(ActionEvent event) {
    counter++;
    if(event.getActionCommand().equals("ResetCmd") ) counter = 0;
    label.setText("Click #" + Integer.toString(counter));
  }
public class MouseEvent extends InputEvent {
  ...
  public int getX() {...}
  public int getY() {...}
  public Point getPoint() {...}
  public int getButton() {...}
  public String paramString() {...}
  ...
}
public interface MouseListener extends EventListener {
  void mouseClicked(MouseEvent event);
  void mousePressed(MouseEvent event);
  void mouseReleased(MouseEvent event);
  void mouseEntered(MouseEvent event);
  void mouseExited(MouseEvent event);
}
JFrame, the position of the mouse pointer is displayed
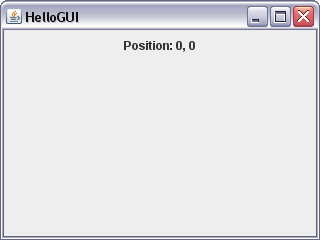
Source code of the example: MyMouseListener.java
class MyGuiMouseListener implements MouseListener {
  ...
}

class MyGui extends JFrame {
  public void createGUI() {
    ...
    JLabel label = new JLabel("Position: 0, 0");
    label.setBounds(120, 0, 150, 30);
    getContentPane().add(label);

    MyGuiMouseListener mouseListener = new MyGuiMouseListener();
    mouseListener.setLabelRef(label);
    addMouseListener(mouseListener);
    ...
  }
}
class MyGuiMouseListener implements MouseListener {
  private JLabel labelRef;
  public void setLabelRef(JLabel label) { labelRef= label; }

  public void mousePressed(MouseEvent event) {
    labelRef.setText("Position: " + Integer.toString(event.getX()) +
                     ", " + Integer.toString(event.getY()));
  }
  public void mouseClicked(MouseEvent event) {}
  public void mouseReleased(MouseEvent event){}
  public void mouseEntered(MouseEvent event) {}
  public void mouseExited(MouseEvent event) {}
}
MouseListener) all methods must exist, even if they are not needed
class MyGuiMouseAdapter extends MouseAdapter {
  private JLabel labelRef;
  public void setLabelRef(JLabel label) { labelRef= label; }
  public void mousePressed(MouseEvent event) {
    labelRef.setText("Position: " + Integer.toString(event.getX()) +
                     ", " + Integer.toString(event.getY()));
  }
}

class MyGui extends JFrame {
  public void createGUI() {
    ...
    MyGuiMouseAdapter mouseAdapter = new MyGuiMouseAdapter();
    mouseAdapter.setLabelRef(label);
    addMouseListener(mouseAdapter);
  }
}
class MyGui extends JFrame {
  public void createGUI() {
    ...
    setLayout(null); // keine automatisches Layout
    setResizeable(false); // Fenstergröße ist nicht veränderbar

    JLabel label = new JLabel("Hello World");
    label.setBounds(120, 0, 150, 30); // manuelles Positionieren
    getContentPane().add(label);
  }
}
public interface LayoutManager {
  void addLayoutComponent(String name, Component component);
  void removeLayoutComponent(Component component);
  Dimension preferredLayoutSize(Container parent);
  Dimension minimumLayoutSize(Container parent);
  void layoutContainer(Container parent);
}
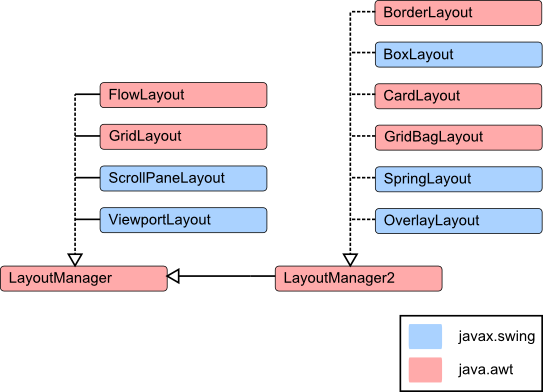
JFrame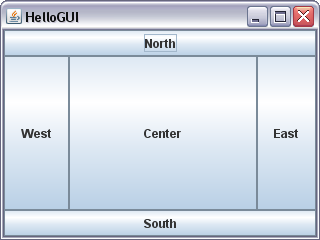
Source code of the example: MyBorderLayout.java
class MyGui extends JFrame{
  public void createGUI() {
    ...
    Container contentPane = getContentPane();
    contentPane.setLayout(new BorderLayout(0,0));
    contentPane.add(BorderLayout.NORTH, new JButton("North"));
    contentPane.add(BorderLayout.EAST, new JButton("East"));
    contentPane.add(BorderLayout.SOUTH, new JButton("South"));
    contentPane.add(BorderLayout.WEST, new JButton("West"));
    contentPane.add(BorderLayout.CENTER, new JButton("Center"));

    setVisible(true);
  }
}
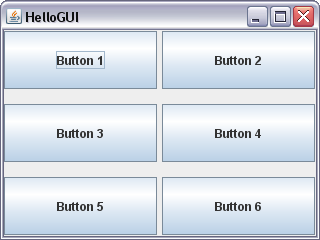
Source code of the example: MyGridLayout.java
class MyGui extends JFrame{
  public void createGUI() {
    ...
    Container contentPane = getContentPane();
    // 3 Zeilen mit Abstand 15, und 2 Spalten mit Abstand 5
    contentPane.setLayout(new GridLayout(3, 2, 5, 15));
    contentPane.add(new JButton("Button 1"));
    contentPane.add(new JButton("Button 2"));
    contentPane.add(new JButton("Button 3"));
    contentPane.add(new JButton("Button 4"));
    contentPane.add(new JButton("Button 5"));
    contentPane.add(new JButton("Button 6"));

    setVisible(true);
  }
}
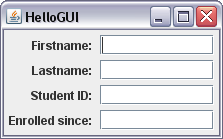
Source code of the example:
MySpringLayout.java, SpringUtilities.java
public void createGUI() { ...
  String[] labels = {"Firstname: ", "Lastname: ",
                     "Student ID: ", "Enrolled since: "};
  Container cp = getContentPane();
  cp.setLayout(new SpringLayout());
  for (int i = 0; i < labels.length; i++) {
    JLabel label = new JLabel(labels[i], JLabel.TRAILING);
    cp.add(label);
    JTextField textField = new JTextField(10);
    label.setLabelFor(textField);
    cp.add(textField);
  }
  SpringUtilities.makeCompactGrid(cp, labels.length, 2, 5, 5, 5, 5);
  pack(); // dense packing
  setVisible(true);
}
JButton starts a long calculation
JProgressBar
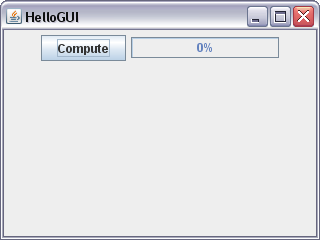
Source code of the example: MyProgressBar.java
class MyGui extends JFrame implements ActionListener {
  final JProgressBar progressBar = new JProgressBar(0, 100);
  final JButton button = new JButton("Compute");
  boolean userStopped = false, threadAlive = false;
  int percent;
  Runnable updateUI = new Runnable() { ... }; // for UI update
  Runnable workerThread = new Runnable() { ... }; // for computation

  public void createGUI() {... }
  public void actionPerformed(ActionEvent event) { // button pressed
    if(!threadAlive) {
      threadAlive = true; userStopped = false;
      new Thread(workerThread).start();
    }
    else userStopped = true;
  }
}
  Runnable workerThread = new Runnable() { // for computation

    public void run() {
      for (int i=0; i < 100 && !userStopped; i++) {
        try {
          Thread.sleep(50); // compute something here
          percent = i;
          // run updateUI in the Event Dispatching Thread
          SwingUtilities.invokeLater(updateUI);
        } catch (InterruptedException e) {}
      }
      percent = 100;
      SwingUtilities.invokeLater(updateUI);
      threadAlive = false;
    }
  };
  Runnable updateUI = new Runnable() { // for UI update

    public void run() {
      if(percent < 100) {
        progressBar.setString("Computing " + percent + "%");
        button.setText("Stop");
      }else{
        progressBar.setString("Done");
        button.setText("Compute");
      }
      progressBar.setValue(percent);
    }
  };
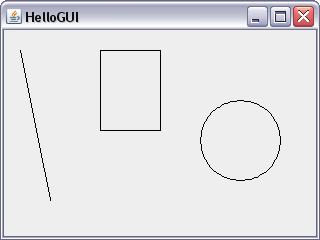
JFrame) by overriding its paint() method
class MyGui extends JFrame {
  public void createGUI() {...}

  public void paint(Graphics g) {
    super.paint(g);
    Graphics2D g2d = (Graphics2D) g; // cast to Graphics2D
    Line2D.Double line = new Line2D.Double(20.0, 50.0,
                                           50.0, 200.0);
    g2d.draw(line);
    Rectangle2D.Double rect = new Rectangle2D.Double(100.0, 50.0,
                                                      60.0, 80.0);
    g2d.draw(rect); // also try g2d.fill(rect);
    Ellipse2D.Double circle = new Ellipse2D.Double(200.0, 100.0,
                                                   80.0, 80.0);
    g2d.draw(circle); // also try g2d.fill(circle);
  }
}
GeneralPath class
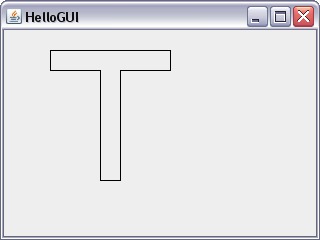
Source code of the example: MyGeneralPath.java
  public void paint(Graphics g) {
    super.paint(g);
    Graphics2D g2d = (Graphics2D) g; // cast to Graphics2D
    GeneralPath gp = new GeneralPath();
    gp.moveTo( 50,  50); // start here
    gp.lineTo( 50,  70); // going down
    gp.lineTo(100,  70); // going right
    gp.lineTo(100, 180); // going down
    gp.lineTo(120, 180); // going right
    gp.lineTo(120,  70); // going up
    gp.lineTo(170,  70); // going right
    gp.lineTo(170,  50); // going up
    gp.lineTo( 50,  50); // going left (back to start)

    g2d.draw(gp); // also try g2d.fill(gp);
  }

Please notify me by e-mail if you have questions, suggestions for improvement, or found typos: Contact