Graphics Programming
GUIs with Java (Android)
Thorsten Thormählen
October 22, 2018
Part 2, Chapter 3
Thorsten Thormählen
October 22, 2018
Part 2, Chapter 3
This is the print version of the slides.
Advance slides with the → key or
by clicking on the right border of the slide
Slides can also be advanced by clicking on the left or right border of the slide.
AndroidManifest.xml generated within the directory structure is particularly importantActivity is run at startup, which styles are used, etc.
<?xml version="1.0" encoding="utf-8"?>
<manifest xmlns:android="http://schemas.android.com/apk/res/android"
      package="de.unimarburg.helloguiapp"
      android:versionCode="1"
      android:versionName="1.0">
    <application android:label="HelloGUIApp">
        <activity android:name="HelloGUI"
                  android:label="HelloGUIApp">
            <intent-filter>
                <action android:name="android.intent.action.MAIN" />
                <category android:name="android.intent.category.LAUNCHER" />
            </intent-filter>
        </activity>
    </application>
</manifest>
android:minSdkVersion)
and what is the highest version of Android that the developer has tested (android:targetSdkVersion)<?xml version="1.0" encoding="utf-8"?> <manifest ....> <uses-sdk android:minSdkVersion="8" android:targetSdkVersion="20" /> ... </manifest>
Activity as a screen-filling top-level container TextView

Source code of the example: HelloGUI.zip
package de.unimarburg.helloguiapp;

import android.app.Activity;
import android.os.Bundle;
import android.widget.TextView;

public class HelloGUI extends Activity {
    @Override
    public void onCreate(Bundle savedInstanceState)
    {
        super.onCreate(savedInstanceState);
        TextView tv = new TextView(this);
        tv.setText("Hello World");
        setContentView(tv);
    }
}
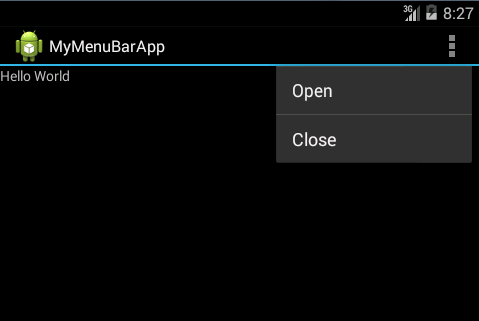
package de.unimarburg.mymenubarapp;
import android.app.Activity;
...
public class MyMenuBar extends Activity {
  public void onCreate(Bundle savedInstanceState) {
    super.onCreate(savedInstanceState);
    TextView tv = new TextView(this);
    tv.setText("Hello World");
    setContentView(tv);
  }
  public boolean onCreateOptionsMenu(Menu menu) {
    SubMenu subMenu = menu.addSubMenu("File");
    subMenu.add("Open");
    subMenu.add("Close");
    return true;
  }
}

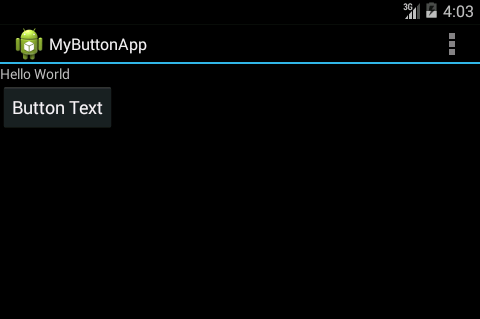
setContentView of an Activity can only be passed one View referenceView.ViewGroup class
public class MyButton extends Activity {
  @Override
  public void onCreate(Bundle savedInstanceState) {
    super.onCreate(savedInstanceState);
    LinearLayout layout = new LinearLayout(this);
    layout.setOrientation(LinearLayout.VERTICAL);
    TextView tv = new TextView(this);
    tv.setText("Hello World");
    layout.addView(tv);
    Button b = new Button(this);
    b.setText("Button Text");
    layout.addView(b);
    LinearLayout.LayoutParams lp;
    lp = (LinearLayout.LayoutParams) b.getLayoutParams();
    lp.width = LinearLayout.LayoutParams.WRAP_CONTENT;
    this.setContentView(layout);
  }
 ...
}

./res/
./res/layout/ for XML layouts ./res/menu/ for menu structures ./res/values/ for constant values, such as strings, colors, numbers, arrays./res/drawable/ for image data./res/values-de/ for German strings, etc. ./res/drawable-ldpi/ for image data (low resolution) ./res/drawable-mdpi/ for image data (medium resolution) ./res/drawable-hdpi/ for image data (high resolution) ./res/drawable-xhdpi/ for image data (especially high resolution) R.java is generated from the resources.
The file contains the class R, which can be accessed in the program code.File: ./res/values/mybuttonstrings.xml
<?xml version="1.0" encoding="utf-8"?>
<resources>
    <string name="textViewString">Hello World</string>
    <string name="buttonString">Button Text</string>
    <string name="menuFile">File</string>
    <string name="menuOpen">Open</string>
    <string name="menuClose">Close</string>
</resources>
File: ./res/menu/mybuttonmenu.xml
<?xml version="1.0" encoding="utf-8"?>
<menu xmlns:android="http://schemas.android.com/apk/res/android">
    <item android:id="@+id/file"
          android:title="@string/menuFile" >
        <menu>
            <item android:id="@+id/open"
                  android:title="@string/menuOpen" />
            <item android:id="@+id/close"
                  android:title="@string/menuClose" />
        </menu>
    </item>
</menu>
File: ./res/layout/mybuttonlayout.xml
<?xml version="1.0" encoding="utf-8"?>
<LinearLayout xmlns:android="http://schemas.android.com/apk/res/android"
    android:layout_width="match_parent"
    android:layout_height="match_parent"
    android:orientation="vertical" >
    <TextView
        android:id="@+id/textView1"
        android:layout_width="wrap_content"
        android:layout_height="wrap_content"
        android:text="@string/textViewString" />
    <Button
        android:id="@+id/button1"
        android:layout_width="wrap_content"
        android:layout_height="wrap_content"
        android:text="@string/buttonString" />
</LinearLayout>
By using the XML description the resulting Java source code often gets shorter:
package de.unimarburg.mybuttonaltapp;

import android.app.Activity;
import android.os.Bundle;
import android.view.Menu;
import android.view.MenuInflater;

public class MyButtonAlt extends Activity {
  @Override
  public void onCreate(Bundle savedInstanceState) {
    super.onCreate(savedInstanceState);
    setContentView(R.layout.mybuttonlayout);
  }

  @Override
  public boolean onCreateOptionsMenu(Menu menu) {
    MenuInflater inflater = getMenuInflater();
    inflater.inflate(R.menu.mybuttonmenu, menu);
    return true;
  }
}
AbstractButtonView class or its child classes
and overwriting of corresponding functions, such as onKeyDown(int keyCode, KeyEvent event)OnKeyListener kl = new OnKeyListener() {
@Override
public boolean onKey (View clickedView, int keyCode, KeyEvent event) {
...
}
}; This event listener instance can then be passed to one or more event sources by View.setOnKeyListener(kl).
TextView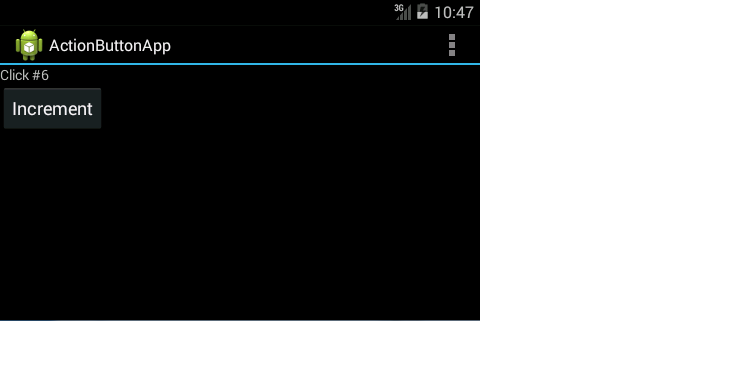
Source code of the example: ActionButton.zip
package de.unimarburg.actionbuttonapp;

import android.app.Activity;
import android.os.Bundle;
import android.view.Menu;
import android.view.SubMenu;
import android.view.View;
import android.view.View.OnClickListener;
import android.widget.Button;
import android.widget.TextView;
import android.widget.LinearLayout;

public class ActionButton extends Activity {

  private int counter = 0;
  TextView tv;

  private OnClickListener cl = new OnClickListener() {
    @Override
    public void onClick(View v) {
      counter++;
      tv.setText("Click #" + Integer.toString(counter));
    }
  };

  @Override
  public void onCreate(Bundle savedInstanceState) {
    super.onCreate(savedInstanceState);
    LinearLayout layout = new LinearLayout(this);
    layout.setOrientation(LinearLayout.VERTICAL);
    tv = new TextView(this);
    tv.setText("Hello World");
    layout.addView(tv);
    Button b = new Button(this);
    b.setText("Increment");
    b.setOnClickListener(cl);
    layout.addView(b);
    LinearLayout.LayoutParams lp;
    lp = (LinearLayout.LayoutParams) b.getLayoutParams();
    lp.width = LinearLayout.LayoutParams.WRAP_CONTENT;
    this.setContentView(layout);
  }

  @Override
  public boolean onCreateOptionsMenu(Menu menu) {
    SubMenu subMenu = menu.addSubMenu("File");
    subMenu.add("Open");
    subMenu.add("Close");
    return true;
  }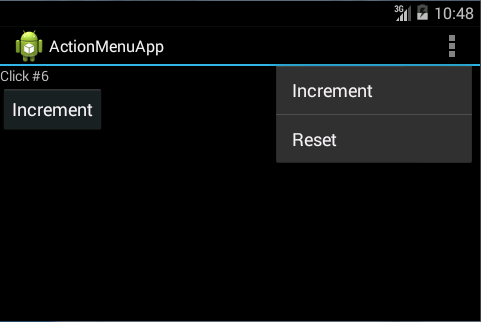
}public class ActionMenu extends Activity {
...
private final int ID_MENU_INC = 1;
private final int ID_MENU_RST = 2;
@Override
public boolean onCreateOptionsMenu(Menu menu) {
menu.add(Menu.NONE, ID_MENU_INC, Menu.NONE, "Increment");
menu.add(Menu.NONE, ID_MENU_RST, Menu.NONE, "Reset");
return true;
}
@Override
public boolean onOptionsItemSelected(MenuItem item) {
counter++;
if(item.getItemId() == ID_MENU_RST) counter = 0;
tv.setText("Click #" + Integer.toString(counter));
return true;
}
}
MotionEvent is used to describe touches and movements with finger, stylus, or mouseGestureDetector.SimpleOnGestureListener to recognize certain gestures:
onDown(MotionEvent e): The user has touched the screen onFling(MotionEvent e1, MotionEvent e2, float velocityX, float velocityY): The user has done a swiping motion onLongPress(MotionEvent e): The user has touched the screen for a long timeonScroll(MotionEvent e1, MotionEvent e2, float distanceX, float distanceY): The user performed a scroll motiononShowPress(MotionEvent e): The user has touched the screen and neither moved nor released itonSingleTapUp(MotionEvent e): The user has touched the screen and released it againTextView
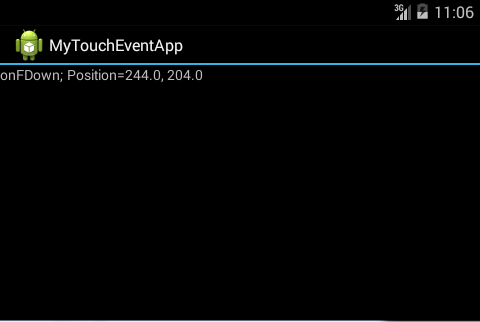
Source code of the example: MyTouchEvent.zip
package de.unimarburg.mytoucheventapp;

import android.app.Activity;
import android.os.Bundle;
import android.widget.TextView;
import android.view.GestureDetector;
import android.view.MotionEvent;

public class MyTouchEvent extends Activity {

  private GestureDetector gestDetector;
  private TextView tv;

  @Override
  public void onCreate(Bundle savedInstanceState) {
    super.onCreate(savedInstanceState);
    tv = new TextView(this);
    tv.setText("Position: 0, 0");
    setContentView(tv);
    MyGestureListener gl = new MyGestureListener();
    gestDetector = new GestureDetector(this, gl);
  }

  @Override
  public boolean onTouchEvent(MotionEvent e) {
    this.gestDetector.onTouchEvent(e);
    return super.onTouchEvent(e);
  }

  class MyGestureListener extends GestureDetector.SimpleOnGestureListener {

    @Override
    public boolean onDown(MotionEvent e) {
      tv.setText("onFDown; Position=" + Float.toString(e.getX()) + ", "
          + Float.toString(e.getY()));
      return true;
    }

    @Override
    public void onLongPress(MotionEvent e) {
      tv.setText("onLongPress; Position=" + Float.toString(e.getX()) + ", "
          + Float.toString(e.getY()));
    }

    @Override
    public boolean onFling(MotionEvent e1, MotionEvent e2, float velocityX,
        float velocityY) {
      tv.setText("onFling: from=" + Float.toString(e1.getX()) + ", "
          + Float.toString(e1.getY()) + " to=" + Float.toString(e2.getX())
          + ", " + Float.toString(e2.getY()));
      return true;
    }
  }
}
onPause() is called.
However, the previous activity is possibly still visible.onStop() is called.onPause()
(e.g., user-specific settings, database records, etc.))onPause(), such that computing power
is not unnecessarily wasted.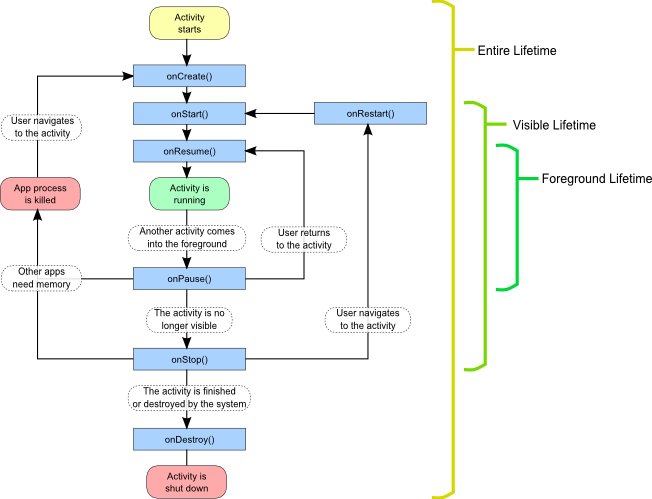
onSaveInstanceState(Bundle state) and onRestoreInstanceState(Bundle state),
which allow to save the current state of this particular instance of the Activity in a Bundle and restore it after a restart Bundle is also passed to the function onCreate(Bundle state), so that the
restoration of the state may also take place there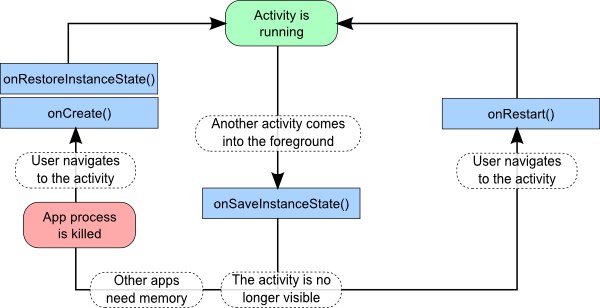
onPause() in the SharedPreferences and is set accordingly after a restarting of the app onSaveInstanceState() and is restored
in onCreate(Bundle state).
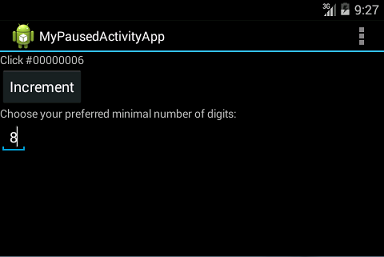
A restart may be enforced by rotating the device (CTRL + F11 or CTRL + F12 in the emulator)Source code of the example: PausedActivity.zip
...

public class PausedActivity extends Activity {

  private int counter = 0; // this value should be maintained per instance
  private int minDigits = 1; // this preference should be maintained globally
  private TextView tv;
  private EditText et;

  private void updateTextView() {
    tv.setText("Click #" + String.format("%0" + minDigits + "d", counter));
  }

  private OnClickListener cl = new OnClickListener() {
    @Override
    public void onClick(View v) {
      counter++;
      updateTextView();
    }
  };

  private TextWatcher tw = new TextWatcher() {
    @Override
    public void afterTextChanged(Editable s) {
      try {
        minDigits = Integer.parseInt(s.toString());
      } catch (NumberFormatException e) {
        minDigits = 1;
      }
      if (minDigits > 255) {
        minDigits = 255;
      }
      if (minDigits < 1) {
        minDigits = 1;
      }
      updateTextView();
    }
    @Override
    public void beforeTextChanged(CharSequence s, int start, int count,
        int after) {
    }
    @Override
    public void onTextChanged(CharSequence s, int start, int before, int count) {
    }
  };

  @Override
  public void onCreate(Bundle savedInstanceState) {
    super.onCreate(savedInstanceState);
    LinearLayout layout = new LinearLayout(this);
    layout.setOrientation(LinearLayout.VERTICAL);
    tv = new TextView(this);
    tv.setText("Hello World");
    layout.addView(tv);

    Button b = new Button(this);
    b.setText("Increment");
    b.setOnClickListener(cl);
    layout.addView(b);
    LinearLayout.LayoutParams lp;
    lp = (LinearLayout.LayoutParams) b.getLayoutParams();
    lp.width = LinearLayout.LayoutParams.WRAP_CONTENT;

    TextView label = new TextView(this);
    label.setText("Choose your preferred minimal number of digits:");
    layout.addView(label);
    et = new EditText(this);
    et.setInputType(InputType.TYPE_CLASS_NUMBER);
    et.setText("1");
    et.addTextChangedListener(tw);
    layout.addView(et);
    lp = (LinearLayout.LayoutParams) et.getLayoutParams();
    lp.width = LinearLayout.LayoutParams.WRAP_CONTENT;

    // if available, restore minDigits from preferences
    SharedPreferences prefs = getPreferences(MODE_PRIVATE);
    if (prefs.contains("minDigitsVal")) {
      minDigits = prefs.getInt("minDigitsVal", 1);
      et.setText(Integer.toString(minDigits));
    }

    // if available, restore counter from the savedInstanceState
    if (savedInstanceState != null
        && savedInstanceState.containsKey("counterVal")) {
      counter = savedInstanceState.getInt("counterVal");
      updateTextView();
    } else {
      tv.setText("Hello World");
    }

    this.setContentView(layout);
  }

  @Override
  protected void onPause() {
    super.onPause();
    // write persistent data to preferences
    SharedPreferences prefs = getPreferences(MODE_PRIVATE);
    SharedPreferences.Editor e = prefs.edit();
    e.putInt("minDigitsVal", minDigits);
    e.commit();
  }

  @Override
  public void onSaveInstanceState(Bundle savedInstanceState) {
    // the superclass handles the state of the view classes in the layout
    super.onSaveInstanceState(savedInstanceState);
    // store member variables of this instance to the savedInstanceState
    savedInstanceState.putInt("counterVal", counter);
  }
  ...
}
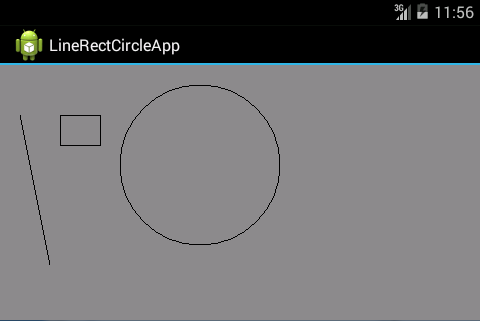
View class
and its onDraw(Canvas canvas) method can be overwritten Canvas class contains various methods for drawing 2D primitives such as lines, rectangles, circles, etc.
  public class MyView extends View {
    Paint paint;
    public MyView(Context context) {
      super(context);
      paint = new Paint();
      paint.setColor(Color.BLACK);
      paint.setStyle(Paint.Style.STROKE);
    }
    @Override
    public void onDraw(Canvas canvas) {
      canvas.drawLine(20.0f, 50.0f, 50.0f, 200.0f, paint);
      canvas.drawRect(100.0f, 50.0f, 60.0f, 80.0f, paint);
      canvas.drawCircle(200.0f, 100.0f, 80.0f, paint);
    }
  }
Path class
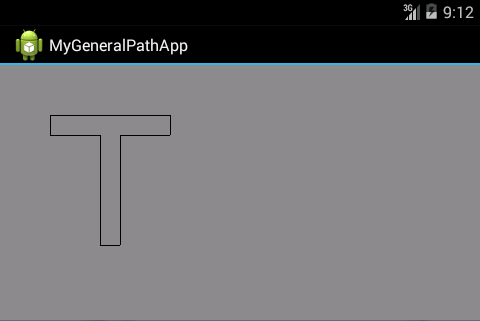
Source code of the example: MyGeneralPath.zip
public class MyView extends View {
  Paint paint;
  Path path;
  public MyView(Context context) {
    super(context);
    paint = new Paint();
    paint.setColor(Color.BLACK);
    paint.setStyle(Paint.Style.STROKE);
    //paint.setStyle(Paint.Style.FILL);
    path = new Path();
    path.moveTo( 50,  50); // start here
    path.lineTo( 50,  70); // going down
    path.lineTo(100,  70); // going right
    path.lineTo(100, 180); // going down
    path.lineTo(120, 180); // going right
    path.lineTo(120,  70); // going up
    path.lineTo(170,  70); // going right
    path.lineTo(170,  50); // going up
    path.close(); // going left (back to start)
  }
  @Override
  public void onDraw(Canvas canvas) {
    canvas.drawPath(path, paint);
  }
}

Please notify me by e-mail if you have questions, suggestions for improvement, or found typos: Contact