Graphics Programming
GUIs with C++ and Qt
Thorsten Thormählen
October 27, 2017
Part 2, Chapter 4
Thorsten Thormählen
October 27, 2017
Part 2, Chapter 4
This is the print version of the slides.
Advance slides with the → key or
by clicking on the right border of the slide
Slides can also be advanced by clicking on the left or right border of the slide.
TARGET = ApplicationName
SOURCES += main.cpp Widget1.cpp Widget2.cpp
HEADERS += Widget1.h Widget2.h
QT += widgets
qmake -o Makefile fake.pro
make
QApplication and QWidgetQLabel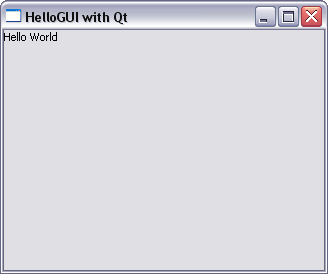
Source code of the example: HelloGUI.cpp
#include <QApplication>
#include <QLabel>
#include <QWidget>

class MyWidget : public QWidget { // our own custom widget
  ...
};

int main (int argc, char* argv[]) {
  // create a QApplication object that handles initialization,
  // finalization, and the main event loop
  QApplication appl(argc, argv);
  MyWidget widget;  // create a widget
  widget.show(); //show the widget and its children
  return appl.exec(); // execute the application
}
#include <QApplication>
#include <QLabel>
#include <QWidget>

class MyWidget : public QWidget{
  public:
    MyWidget(QWidget *parent = NULL) : QWidget(parent) {
        this->resize(320, 240);
        this->setWindowTitle("HelloGUI with Qt");
        QLabel* label = new QLabel("Hello World", this);
    }
};

int main (int argc, char* argv[]) {
  ...
}
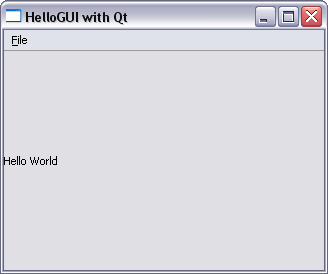
class MyWidget : public QMainWindow {
 public:
    MyWidget(QWidget *parent = NULL) : QMainWindow(parent) {
        this->resize(320, 240);
        this->setWindowTitle("HelloGUI with Qt");
        QLabel* label = new QLabel("Hello World", this);
        createMenus();
    }
  private:
    void createMenus() {
      QMenuBar *bar = menuBar();
      QMenu *fileMenu = bar->addMenu(tr("&File"));
      fileMenu->addAction(new QAction("Open", this));
      fileMenu->addAction(new QAction("Close", this));
    }
};
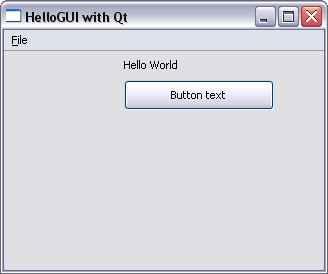
class MyWidget : public QMainWindow {
 public:
    MyWidget(QWidget *parent = NULL) : QMainWindow(parent) {
        ...
        QLabel* label = new QLabel("Hello World", this);
        label->setGeometry(120, 20, 150, 30);
        QPushButton* button = new QPushButton( "Button text", this);
        button->setGeometry(120, 50, 150, 30);
        createMenus();
    }
  private:
    void createMenus() {...}
};

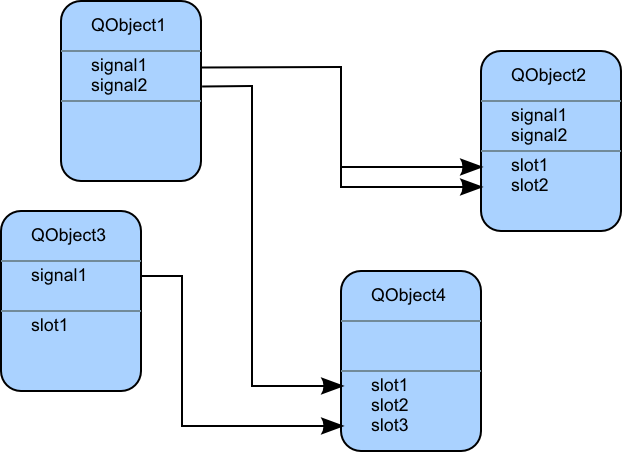
QPushButtonconnect() function
connect() can also be performed by a third party
class QAbstractButton : public QWidget {
  Q_OBJECT
public:
  QAbstractButton(QWidget* parent=0);
  void setText(const QString &text);
  ...
public slots:
  void click();
  void toggle();
  ...
signals:
  void pressed();
  void released();
  ...
};
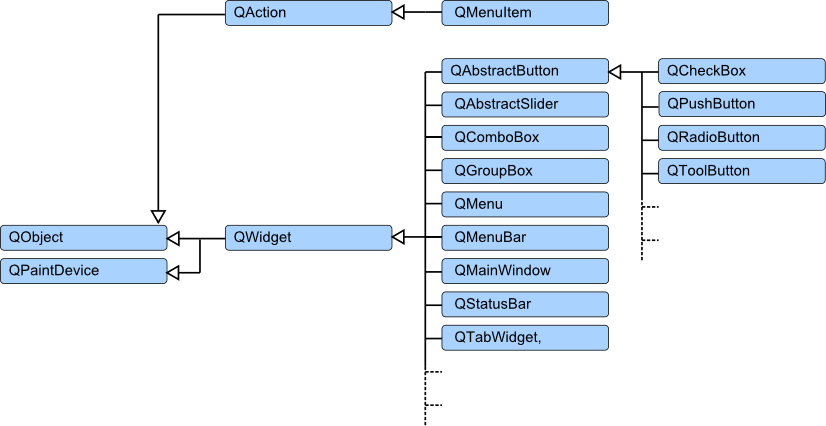
QObject
QObject QObject, must be declared in a header file, and
must be identified by the keyword "Q_OBJECT", so that the MOC can perform its task
Source code of the example:
ActionButton.cpp, MyWidget.h
#ifndef MYWIDGET_H
#define MYWIDGET_H
#include <QMainWindow>
...
class MyWidget : public QMainWindow {
    Q_OBJECT
public:
  MyWidget(QWidget *parent = NULL) : QMainWindow(parent) {...}
public slots:
  void buttonClicked() {...}
private:
  void createMenus() {...}
private:
  int counter;
  QLabel* label;
};
#endif // MYWIDGET_H
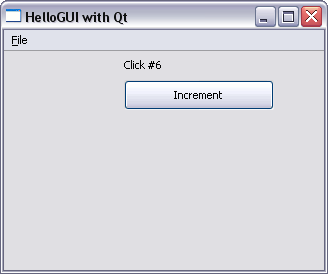
public:
  MyWidget(QWidget *parent = NULL) : QMainWindow(parent) {
    ...
    counter = 0;
    label = new QLabel("Hello World", this);
    label->setGeometry(120, 20, 150, 30);
    QPushButton* button = new QPushButton( "Increment", this);
    button->setGeometry(120, 50, 150, 30);
    QObject::connect(button, SIGNAL(clicked()),
                     this, SLOT(buttonClicked()));
    createMenus();
  }
public slots:
  void buttonClicked() {
      counter++;
      label->setText(QString("Click #%1").arg(counter));
  }
Source code of the example:
ActionMenu.cpp, MyWidget.h
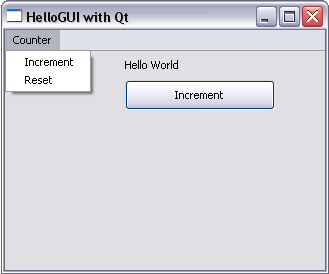
class MyWidget : public QMainWindow {
    Q_OBJECT
public:
  MyWidget(QWidget *parent = NULL) : QMainWindow(parent) {
    ...
    createActions();
    createMenus();
    QObject::connect(button, SIGNAL(clicked()),
                     this, SLOT(buttonClicked()));
    QObject::connect(incrementAct, SIGNAL(triggered()),
                     this, SLOT(buttonClicked()));
    QObject::connect(resetAct, SIGNAL(triggered()),
                     this, SLOT(resetClicked()));
  }
  ...
 ...
private:
  void createActions() {
    incrementAct = new QAction("Increment", this);
    incrementAct->setShortcut(QKeySequence(Qt::ALT + Qt::Key_I));
    incrementAct->setToolTip(tr("Increment the counter"));
    resetAct = new QAction("Reset", this);
    resetAct->setShortcut(QKeySequence(Qt::ALT + Qt::Key_R));
    resetAct->setToolTip(tr("Reset the counter"));
  }
  void createMenus() {
    QMenuBar* bar = menuBar();
    QMenu* fileMenu = bar->addMenu(tr("Counter"));
    fileMenu->addAction(incrementAct);
    fileMenu->addAction(resetAct);
  }
  ...
class QWidget : public QObject, public QPaintDevice {
    ...
protected: // Event handlers
  virtual void mousePressEvent(QMouseEvent *);
  virtual void mouseReleaseEvent(QMouseEvent *);
  virtual void mouseDoubleClickEvent(QMouseEvent *);
  virtual void mouseMoveEvent(QMouseEvent *);
  virtual void wheelEvent(QWheelEvent *);
  virtual void keyPressEvent(QKeyEvent *);
  virtual void keyReleaseEvent(QKeyEvent *);
  virtual void focusInEvent(QFocusEvent *);
  virtual void focusOutEvent(QFocusEvent *);
  ...
}
QWidget
QWidget displays the position of the mouse pointer as a text
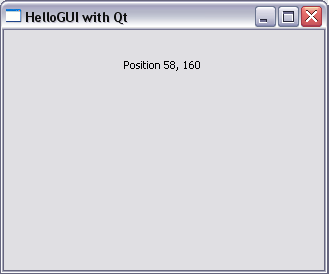
Source code of the example: MyMouseEvent.cpp
class MyWidget : public QWidget {
public:
  MyWidget(QWidget *parent = NULL) : QWidget(parent) {
    this->resize(320, 240);
    this->setWindowTitle("HelloGUI with Qt");
    label = new QLabel("Position 0, 0", this);
    label->setGeometry(120, 20, 150, 30);
  }
protected:
  void mousePressEvent(QMouseEvent *e)
  {
    int x = e->x(); int y = e->y();
    label->setText(QString("Position %1, %2").arg(x).arg(y));
  }
private:
  QLabel* label;
};
addStretch() inserts a QSpacerItem. This component fills the unused space
and thereby allows, for example, to push the other components to the left or right border

Source code of the example: HorizontalLayout.cpp
class MyWidget : public QWidget {

public:
  MyWidget(QWidget *parent = NULL) : QWidget(parent) {
    this->setWindowTitle("HelloGUI with Qt");
     QPushButton* but1 = new QPushButton("Button 1");
     QPushButton* but2 = new QPushButton("Button 2");
     QPushButton* but3 = new QPushButton("Button 3");

     QHBoxLayout *layout = new QHBoxLayout;
     layout->addWidget(but1);
     layout->addWidget(but2);
     layout->addWidget(but3);
     //layout->addStretch(); // try this
     this->setLayout(layout);
  }
};
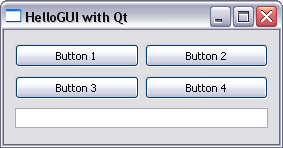
Source code of the example: MyQGridLayout.cpp
class MyWidget : public QWidget {
public:
  MyWidget(QWidget *parent = NULL) : QWidget(parent) {
     QPushButton* but1 = new QPushButton("Button 1");
     QPushButton* but2 = new QPushButton("Button 2");
     QPushButton* but3 = new QPushButton("Button 3");
     QPushButton* but4 = new QPushButton("Button 4");
     QLineEdit* edit = new QLineEdit();
     QGridLayout* layout = new QGridLayout();
     layout->addWidget(but1, 0, 0);
     layout->addWidget(but2, 0, 1);
     layout->addWidget(but3, 1, 0);
     layout->addWidget(but4, 1, 1);
     layout->addWidget(edit, 2, 0, 1, 2);
     this->setLayout(layout);
  }
};
addLayout() or by adding a new window that has its own internal layout
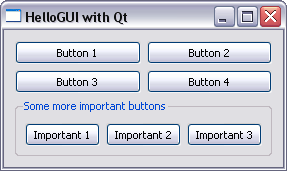
Source code of the example: NestedLayouts.cpp
  QGroupBox *groupBox = new QGroupBox("Some more important buttons");
  QPushButton* impBut1 = new QPushButton("Important 1");
  QPushButton* impBut2 = new QPushButton("Important 2");
  QPushButton* impBut3 = new QPushButton("Important 3");
  QHBoxLayout *hlayout = new QHBoxLayout;
  hlayout->addWidget(impBut1);
  hlayout->addWidget(impBut2);
  hlayout->addWidget(impBut3);
  QGridLayout* layout = new QGridLayout();
  layout->addWidget(but1, 0, 0);
  layout->addWidget(but2, 0, 1);
  layout->addWidget(but3, 1, 0);
  layout->addWidget(but4, 1, 1);
  groupBox->setLayout(hlayout);
  layout->addWidget(groupBox, 2, 0, 1, 2);
  this->setLayout(layout);
QGraphicsScene instance is generated that is then display by the class QGraphicsView
class MyWidget : public QMainWindow {
public:
  MyWidget(QWidget *parent = NULL) : QMainWindow(parent) {
    this->setWindowTitle("HelloGUI with Qt");
    this->resize(320, 240);
    QGraphicsScene* scene = new QGraphicsScene();
    scene->addLine(20.0, 50.0, 50.0, 200.0);
    scene->addRect(100.0, 50.0, 60.0, 80.0);
    scene->addEllipse(200.0, 100.0, 80.0, 80.0);
    QGraphicsView* view = new QGraphicsView(scene);
    setCentralWidget(view);
  }
};
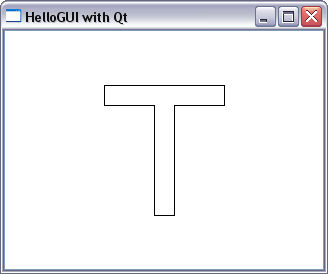
    QGraphicsScene* scene = new QGraphicsScene();
    QPolygonF polygon;
    polygon <<
    QPointF( 50,  50)  << // start here
    QPointF( 50,  70)  << // going down
    QPointF(100,  70)  << // going right
    QPointF(100, 180)  << // going down
    QPointF(120, 180)  << // going right
    QPointF(120,  70)  << // going up
    QPointF(170,  70)  << // going right
    QPointF(170,  50)  << // going up
    QPointF( 50,  50);   // going left (back to start)
    scene->addPolygon(polygon);
Please notify me by e-mail if you have questions, suggestions for improvement, or found typos: Contact