Multimedia Signal Processing
Fundamentals and Applications
Thorsten Thormählen
April 13, 2026
Part 2, Chapter 1
Thorsten Thormählen
April 13, 2026
Part 2, Chapter 1
This is the print version of the slides.
Advance slides with the → key or
by clicking on the right border of the slide
Slides can also be advanced by clicking on the left or right border of the slide.
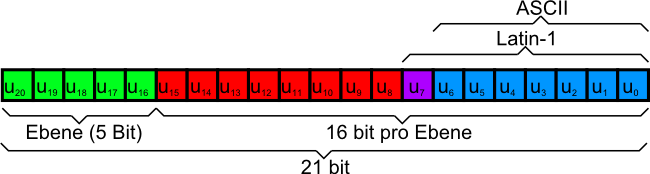
| Hex Code | …0 | …1 | …2 | …3 | …4 | …5 | …6 | …7 | …8 | …9 | …A | …B | …C | …D | …E | …F |
|---|---|---|---|---|---|---|---|---|---|---|---|---|---|---|---|---|
| 0… | NUL | SOH | STX | ETX | EOT | ENQ | ACK | BEL | BS | HT | LF | VT | FF | CR | SO | SI |
| 1… | DLE | DC1 | DC2 | DC3 | DC4 | NAK | SYN | ETB | CAN | EM | SUB | ESC | FS | GS | RS | US |
| 2… | SP | ! | " | # | $ | % | & | ' | ( | ) | * | + | , | - | . | / |
| 3… | 0 | 1 | 2 | 3 | 4 | 5 | 6 | 7 | 8 | 9 | : | ; | < | = | > | ? |
| 4… | @ | A | B | C | D | E | F | G | H | I | J | K | L | M | N | O |
| 5… | P | Q | R | S | T | U | V | W | X | Y | Z | [ | \ | ] | ^ | _ |
| 6… | ` | a | b | c | d | e | f | g | h | i | j | k | l | m | n | o |
| 7… | p | q | r | s | t | u | v | w | x | y | z | { | | | } | ~ | DEL |
| ISO 8859-1 | Western European (Latin-1) |
| ISO 8859-2 | Central European (Latin-2) |
| ISO 8859-3 | South European (Latin-3) |
| ISO 8859-4 | North European (Latin-4) |
| ISO 8859-5 | Latin/Cyrillic |
| ISO 8859-6 | Arabic |
| ISO 8859-7 | Greek |
| ISO 8859-8 | Hebrew |
| ISO 8859-9 | Turkish (Latin-5) |
| ISO 8859-10 | Nordic (Latin-6) |
| ISO 8859-11 | Thai |
| ISO 8859-12 | verworfen |
| ISO 8859-13 | Baltic Rim (Latin-7) |
| ISO 8859-14 | Celtic (Latin-8) |
| ISO 8859-15 | Western European (Latin-9) |
| ISO 8859-16 | South-Eastern Eur. (Latin-10) |

<p>This is some text</p>
<p>This is more text <br> with a line break</p>
<p>Please visit my <a href="otherSite.html">other website</a> with more text</p>
<!doctype html>

<html>
<head>
  <meta charset="utf-8">
  <title>A simple HTML5 example</title>
</head>

<body>
  <h1>This is a heading</h1>
  <p>This is some text</p>
  <h2>This is a smaller heading</h2>
  <p>This is more text <br> with a line break</p>
  <p>Please visit my <a href="otherSite.html">other website</a> with more text</p>
</body>
</html>
Source code: simple.html
charset<!doctype html> <html> <head> <meta charset="utf-8"> <title>International order</title> </head> <body> <h1>International order</h1> <p>Hello German user: Thormählen with ä. Please pay 1000 €.</p> <p>Hello Chinese user: 譚 天 翰. Please pay 1000 ¥.</p> </body> </html>
Source code: charset.html
<!doctype html>
<html>
  <head>
    <meta charset="utf-8">
    <title>A simple HTML5 and CSS example</title>
    <style>
      body {
        font-family: Verdana, Arial, Helvetica, sans-serif;
        background-color: #003366;
        color: #FFFFFF;
      }
      p {
        color: #808080;
      }
      .myClass {
        color: #00FF00;
        font-style: italic;
      }

      #myUniqueId {
        color: #00FFFF;
      }
    </style>
  </head>

  <body>
    <h1>This is a heading</h1>
    <p>This is some text</p>
    <p class="myClass">This is text of type "myclass"</p>
    <p>This is more normal text</p>
    <p class="myClass">This is more text of type "myclass"</p>
    <p id="myUniqueId" class="myClass">This text of type "myclass"
                                       has an ID that makes it unique</p>
  </body>
</html>
Source code: simplecss.html
<!doctype html>
<html>
  <head>
    <meta charset="utf-8">
    <title>A simple HTML5 and CSS example</title>
    <link rel="stylesheet" href="styles.css">
  </head>

  <body>
    ...
  </body>
</html>
<div> and <span><div> and <span> can be used to structure a
HTML document
and are also important when assigning CSS styles<div> element elements are arranged
in blocks while the <span> elements are arranged in a line
<!doctype html>
<html>
  <head>
    <meta charset="utf-8">
    <title>A simple HTML5 and CSS example</title>
    <style type="text/css">
      body {
        font-family: Verdana, Arial, Helvetica, sans-serif;
        background-color: #000000;
        color: #FFFFFF;
      }
      .myRedDivs {
        background-color: #FF0000;
      }
      .myGreenDivs {
        background-color: #00FF00;
      }
      .myBlueSpan {
        background-color: #0000FF;
      }
    </style>
  </head>

  <body>
    <div class="myRedDivs">
      <h1>This is a heading</h1>
      <p>This is some text</p>
    </div>
    <div class="myGreenDivs">
      <h1>This is a heading</h1>
      <p>This is some text</p>
    </div>
    <div class="myRedDivs">
      <h1>This is a <span class="myBlueSpan">heading</span></h1>
      <p>This is some text</p>
    </div>
  </body>
</html>
Source code: css_div_span.html
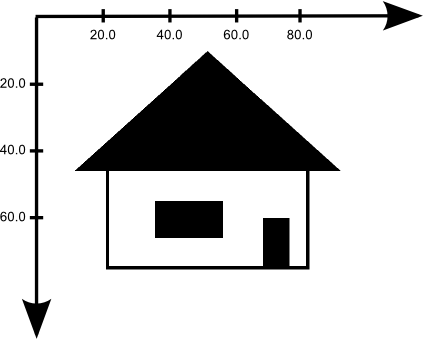
public void paint(Graphics g) {
  Graphics2D g2d = (Graphics2D) g; // cast to Graphics2D
  g2d.draw(new Rectangle2D.Double(20.75, 45.0, 60.0, 30.00) );
  g2d.fill(new Rectangle2D.Double(67.33, 60.0,  8.0, 15.00) );
  g2d.fill(new Rectangle2D.Double(35.00, 55.0, 20.3, 11.00) );
  GeneralPath triangle = new GeneralPath();
  triangle.moveTo(10.75, 46.0);
  triangle.lineTo(90.75, 46.0);
  triangle.lineTo(50.75, 10.0);
  triangle.closePath();
  g2d.fill(triangle);
 }
Full source code:
MyGraphics2DHouse.java

To create 2D vector graphics, there are many free and commercial programs:
Popular file formats for storing 2D vector graphics are:
<svg> element<img> element<canvas> element<svg> element
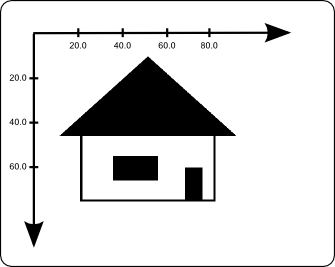
<!doctype html>

<html>
  <head>
    <meta charset="utf-8">
    <title>An example for inline SVG</title>
  </head>

  <body>
    <h1>An example for inline SVG</h1>
    <p>This is some text</p>
    <svg width="100" height="100" style="border:1px solid black;">
      <rect x="20.75" y="45.0" width="60.0" height="30.0" style="fill:none; stroke-width:1; stroke:rgb(0,0,0);" />
      <rect x="67.33" y="60.0" width="8.0" height="15.0" style="fill:rgb(0,0,0); stroke:none;" />
      <rect x="35.0" y="55.0" width="20.3" height="11.0" style="fill:rgb(0,0,0); stroke:none;" />
      <polygon points="10.75,46.0 90.75,46.0 50.75,10.0" style="fill:rgb(0,0,0); stroke:none;" />
    </svg>
  </body>
</html>
Source code: svg.html
<img> element
<!doctype html>

<html>
  <head>
    <meta charset="utf-8">
    <title>An example for embedding an SVG object</title>
  </head>

  <body>
    <h1>An example for embedding an SVG object</h1>
    <p>This is some text</p>
    <img src="./house.svg"  style="width:200px; height:200px" alt="house">
  </body>
</html>
Source code: svg_import.html
<canvas> element
<!doctype html>

<html>
  <head>
    <meta charset="utf-8">
    <title>An example for drawing in an HTML canvas element</title>
    <script>
      function draw() {
        var c = document.getElementById("myCanvas");
        var ctx = c.getContext("2d");
        ctx.lineWidth = "1";
        ctx.strokeStyle = "#000000";
        ctx.beginPath();
        ctx.rect(20.75, 45.0, 60.0, 30.00);
        ctx.stroke();
        ctx.beginPath();
        ctx.rect(67.33, 60.0, 8.0, 15.00);
        ctx.fill();
        ctx.beginPath();
        ctx.rect(35.00, 55.0, 20.3, 11.00);
        ctx.fill();
        ctx.beginPath();
        ctx.moveTo(10.75, 46.0);
        ctx.lineTo(90.75, 46.0);
        ctx.lineTo(50.75, 10.0);
        ctx.closePath();
        ctx.fill();
       }
    </script>
  </head>


  <body onload="draw();">
    <h1>An example for drawing in an HTML canvas element</h1>
    <p>This is some text</p>
    <canvas id="myCanvas" width="100" height="100">
      Your browser does not support the HTML5 canvas tag.
    </canvas>
  </body>
</html>
Source code: canvas.html
class RasterImage {
protected int imageWidth;
protected int imageHeight;
protected int[] imageData;

public RasterImage(int width, int height) {
  imageData = new int[width*height]; ...
}
public int getPixel(int x, int y) {
  return imageData[y*imageWidth+x];
}
public void setPixel(int pixelValue, int x, int y) {
  imageData[y*imageWidth+x] = pixelValue;
}
...
};
template<typename T> class RasterImage {
protected:
  unsigned imageWidth;
  unsigned imageHeight;
  T* imageData;
public:
  RasterImage(unsigned width, unsigned height) {
    imageData = new T[width*height]; ...
  }
  const T getPixel(unsigned x, unsigned y) const {
    return imageData[y*imageWidth+x];
  }
  void setPixel(T pixelValue, unsigned x, unsigned y) {
    imageData[y*imageWidth+x] = pixelValue;
  }
  ...
};
MyPaintPanel extends JPanel {
private BufferedImage img = null;
public void createGUI() {
  try { img = ImageIO.read(new File("./horse.jpg")); }
  catch (IOException e) { System.out.println("failed to load image"); }
  ...
}
public void paint(Graphics g) {
  super.paint(g); Graphics2D g2d = (Graphics2D) g;
  int oldRgb = img.getRGB(10, 100); // read a pixel
  int rgb = 0xFFFF0000; // Alpha-Red-Green-Blue
  img.setRGB(10, 100, rgb); // draw red pixel
  g.drawImage(img, 0, 0, null);
}
}
Source code of the example: MyBufferedImage.java
There are many free and commercial image editing programs:
Popular file formats for raster graphics are:
<!doctype html>
<html>
<head>
  <meta charset="utf-8">
  <title>How to add an image</title>
</head>
<body>
  <h1>How to add an image</h1>
  <p>This is an image
  <img src="./horse.jpg" alt="horse">
  that is inline with the text</p>
  <hr>
  <p>This is an image
  <img src="./horse.jpg" alt="horse" style="vertical-align: middle;">
  that is inline with the text and vertically centered</p>
  <hr>
  <p>This is an image
  <img src="./horse.jpg" alt="horse" style="display: block;">
  that is displayed as a block (no text at any side)</p>
</body>
</html>
Source code: img.html
<canvas> element<canvas> element
<!doctype html>

<html>

<head>
  <meta charset="utf-8">
  <title>An example for manipulating pixels in an HTML canvas element</title>
  <script>
    function draw() {
      var c = document.getElementById("myCanvas");
      var ctx = c.getContext("2d");
      var width = c.width;
      var height = c.height;
      var image = ctx.getImageData(0, 0, width, height);
      var imageData = image.data;
      for (var x = 0; x < width; x++) {
        for (var y = 0; y < height; y++) {
          if (x < 50 && y < 50) {
            imageData[x * 4 + y * width * 4 + 0] = 255; // red;
            imageData[x * 4 + y * width * 4 + 1] = 255; // green;
            imageData[x * 4 + y * width * 4 + 2] = 0;   // blue;
            imageData[x * 4 + y * width * 4 + 3] = 255; // alpha;
          } else {
            imageData[x * 4 + y * width * 4 + 0] = 0;   // red;
            imageData[x * 4 + y * width * 4 + 1] = 0;   // green;
            imageData[x * 4 + y * width * 4 + 2] = 0;   // blue;
            imageData[x * 4 + y * width * 4 + 3] = 255; // alpha;
          }
        }
      }
      ctx.putImageData(image, 0, 0);
    }
  </script>
</head>


<body onload="draw();">
  <h1>An example for manipulating pixels in an HTML canvas element</h1>
  <p>This is some text</p>
  <canvas id="myCanvas" width="100" height="100">
    Your browser does not support the HTML5 canvas tag.
  </canvas>
</body>

</html>
Source code: canvas_pixels.html
Please notify me by e-mail if you have questions, suggestions for improvement, or found typos: Contact